安装前准备
建立所需用户和组
建立所需组:
/usr/sbin/groupadd -g 12345 ibm建立所需用户,并添加用户到相关组:
/usr/sbin/useradd -u 12345 -g ibm was
passwd was
检查和调整操作系统配置
- 为了避免问题,确保Linux操作系统的缺省Shell为bash。验证方式:
readlink /bin/sh预期结果应为bash。
- 检查Linux系统中应包含如下内容:
- 内核和C运行时库。
- C++运行时库。
- X Window System 库和运行时。
- GTK 运行时库。
- 检查操作系统:
- umask应为022
umask- 如果需要使用图形安装产品,需要下载并安装Mozilla Firefox Web浏览器。
- 停止服务器上与WebSphere Application Server 相关的任何Java进程。
- 停止任何Web服务器进程,如Nginx、Apache HTTP Server。
- 保证至少有2GB可用空间。
- 修改最大文件打开数,防止添加节点时报错:
cd ~
vi .bashrc
添加:
ulimit -n 8192- 如果/etc/issue文件已被修改,需要将其还原。安装程序使用该文件验证操作系统版本。如果无法还原,那么忽略有关“不受支持的操作系统”相关的消息。
安装依赖包
安装下列依赖包:
yum install gtk2 libXtst xorg-x11-fonts-Type1 psmisc准备安装目录
使用root用户,建立安装目录并授权
mkdir -p /u01/IBM/InstallationManager
chown -R was:ibm /u01/IBM
chmod 775 /u01/IBM/InstallationManager将agent.installer.linux.gtk.x86_64_1.9.1006.20210614_1906.zip、IBM_JAVA8_SDK.zip、WAS9056_ND.zip、WAS9056_SUPPLEMENTS.zip四个文件上传至/software/Installer/Middleware。
安装步骤
安装IBM Installation Manager
解压agent.installer.linux.gtk.x86_64_1.9.1006.20210614_1906.zip
cd /software/Installer/Middleware
mkdir IM
unzip agent.installer.linux.gtk.x86_64_1.9.1006.20210614_1906.zip -d IM
目录中应有如下文件:
[was@xnstu001 IM]$ pwd
/software/Installer/Middleware/IM
[was@xnstu001 IM]$ ll
总用量 672
-rwxr-xr-x  1 was ibm  4642 6月  14 19:22 con-disk-set-inst.sh
drwxr-xr-x  3 was ibm    50 6月  14 19:22 configuration
drwxr-xr-x 13 was ibm   122 6月  14 19:22 documentation
-rwxr-xr-x  1 was ibm 80385 11月 23 2016 groupinst
-rwxr-xr-x  1 was ibm 80385 11月 23 2016 groupinstc
-rwxr-xr-x  1 was ibm   245 6月  14 19:22 groupinstc.ini
-rwxr-xr-x  1 was ibm   200 6月  14 19:22 groupinst.ini
-rwxr-xr-x  1 was ibm 80385 11月 23 2016 install
-rwxr-xr-x  1 was ibm 80385 11月 23 2016 installc
-rwxr-xr-x  1 was ibm   243 6月  14 19:22 installc.ini
-rwxr-xr-x  1 was ibm   198 6月  14 19:22 install.ini
-rwxr-xr-x  1 was ibm   265 6月  14 19:22 install.xml
drwxr-xr-x  3 was ibm    17 6月  14 19:22 jre_8.0.6030.20210602_1357
drwxr-xr-x  2 was ibm  4096 6月  14 19:22 license
drwxr-xr-x  2 was ibm  4096 6月  14 19:22 native
drwxr-xr-x  2 was ibm   128 6月  14 19:22 Offerings
drwxr-xr-x 11 was ibm 86016 6月  14 19:22 plugins
-rwxr-xr-x  1 was ibm  9918 2月  23 2021 readme.html
-rwxr-xr-x  1 was ibm   277 6月  14 19:22 repository.config
-rwxr-xr-x  1 was ibm 10934 6月  14 19:22 repository.xml
-rwxr-xr-x  1 was ibm   249 6月  14 19:22 silent-install.ini
drwxr-xr-x  2 was ibm    70 6月  14 19:22 tools
-rwxr-xr-x  1 was ibm 80385 11月 23 2016 userinst
-rwxr-xr-x  1 was ibm 80385 11月 23 2016 userinstc
-rwxr-xr-x  1 was ibm   247 6月  14 19:22 userinstc.ini
-rwxr-xr-x  1 was ibm   202 6月  14 19:22 userinst.ini
-rwxr-xr-x  1 was ibm   256 6月  14 19:22 user-silent-install.ini
[was@xnstu001 IM]$
配置DISPLAY变量:
配置DISPLAY变量为ssh客户端的IP,如:
export DISPLAY=192.168.10.21:0.0运行userinst
./userinst将 Installation Manager安装在如下位置:
/u01/IBM/InstallationManager/eclipse安装完成后点击“重新启动Installation Manager”。
配置存储库
重新启动Installation Manager后,在新打开的窗口点击“文件”——“首选项”。
在“存储库”选项中,选择“添加存储库”。
浏览添加/software/Installer/Middleware/IBM_JAVA8_SDK.zip、/software/Installer/Middleware/WAS9056_ND.zip、/software/Installer/Middleware/WAS9056_SUPPLEMENTS.zip。添加完成后测试连接,确保所有存储库均可正常连接。
安装WebSphere Application Server
回到主界面,点击“安装”。进行WebSphere Application Server的安装。
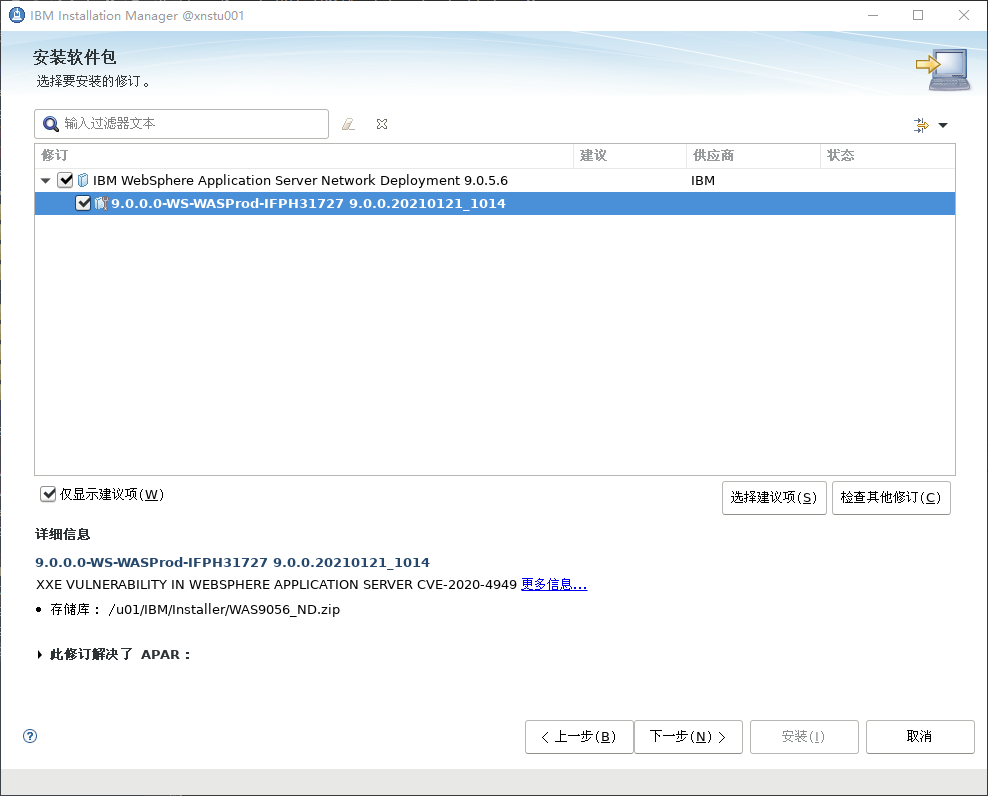
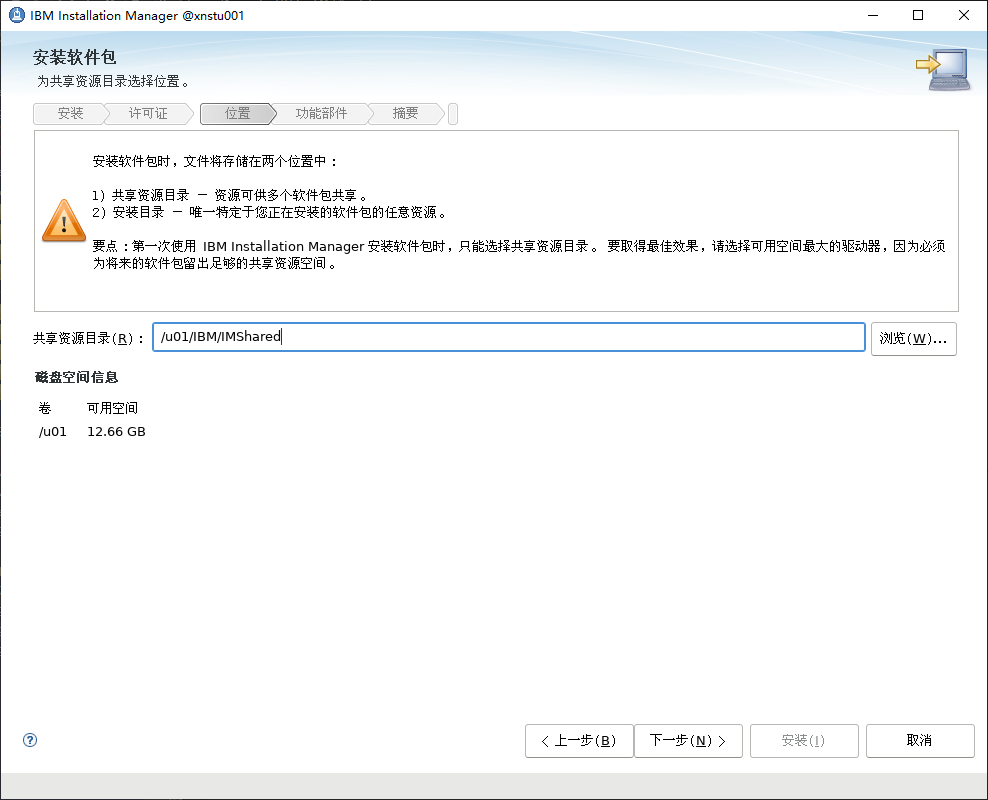
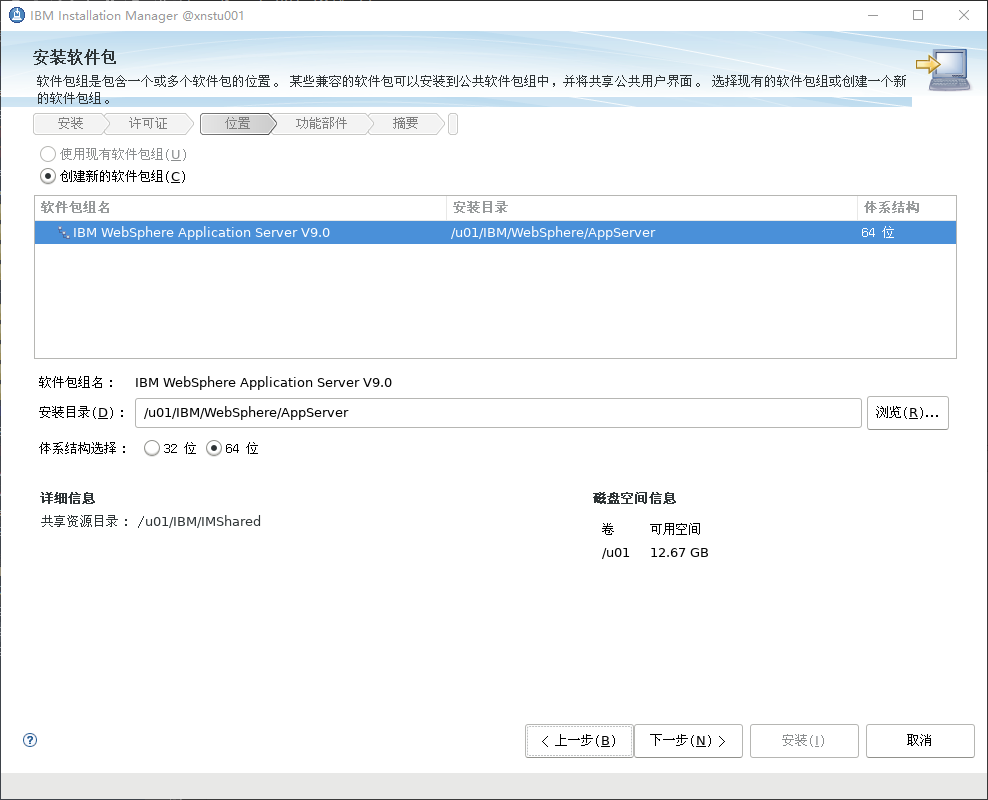
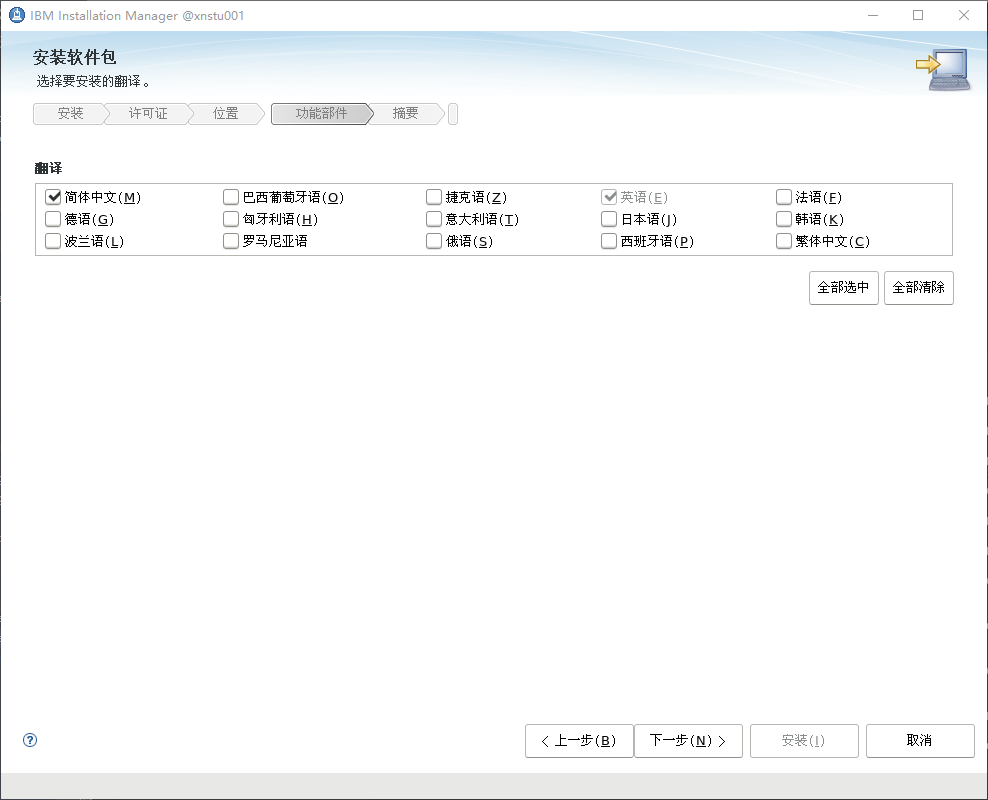
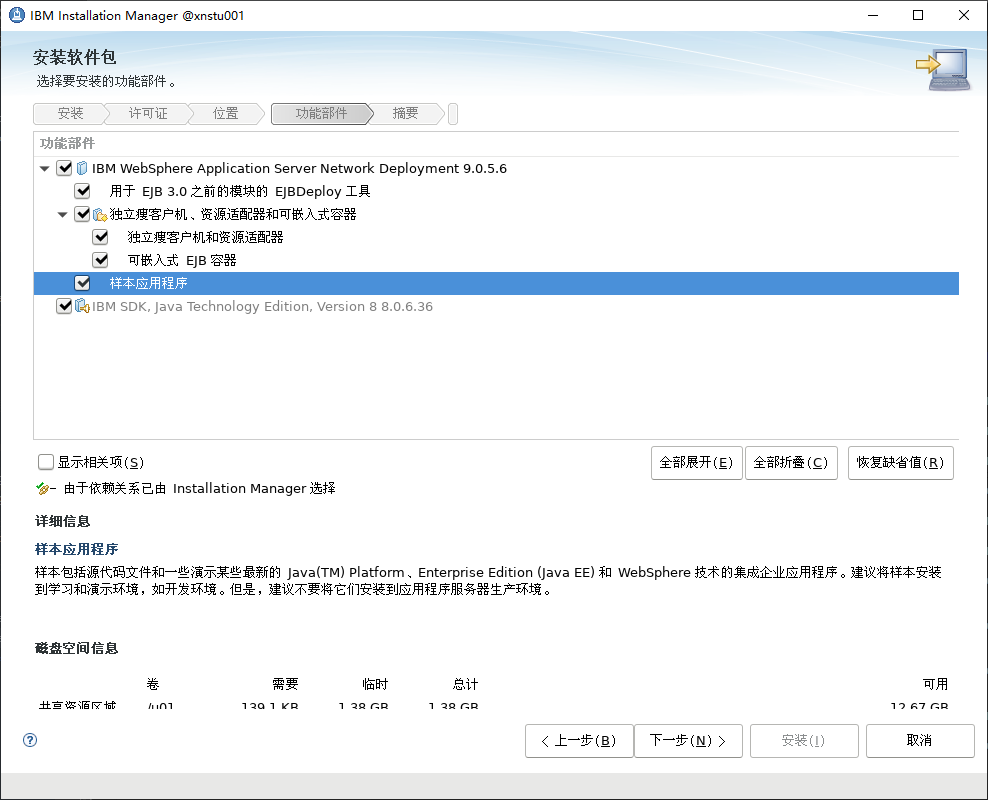
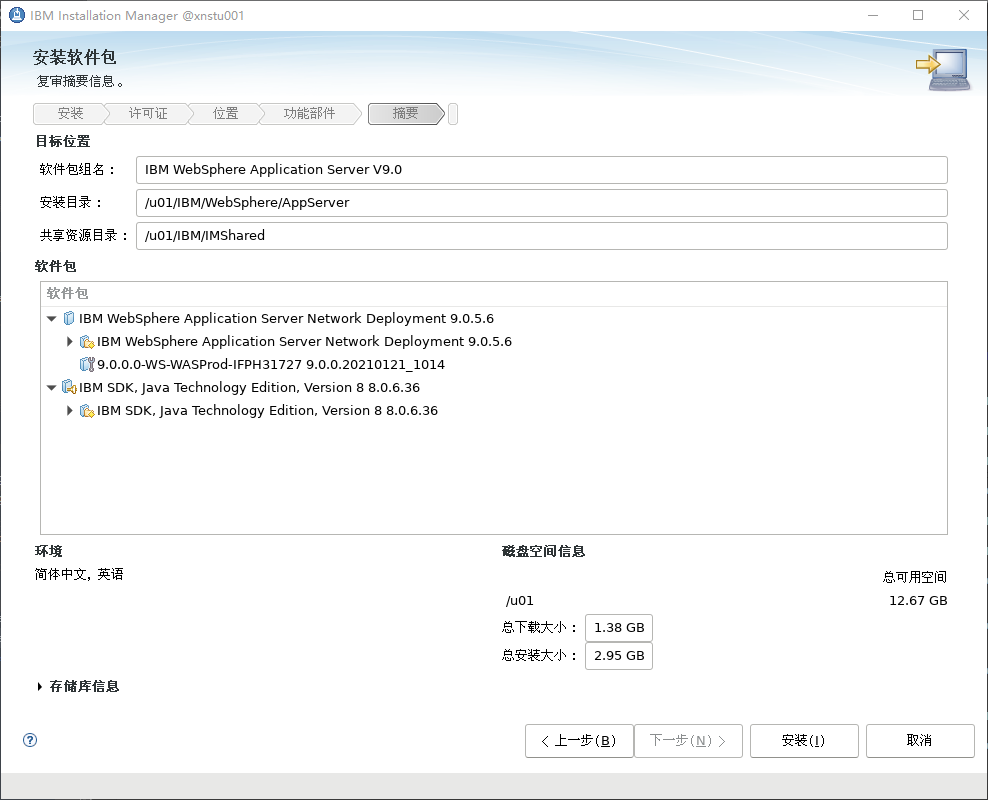
按下图选择需要安装的组件和安装位置:
- 仅选择安装
IBM WebSphere Application Server Network Deployment
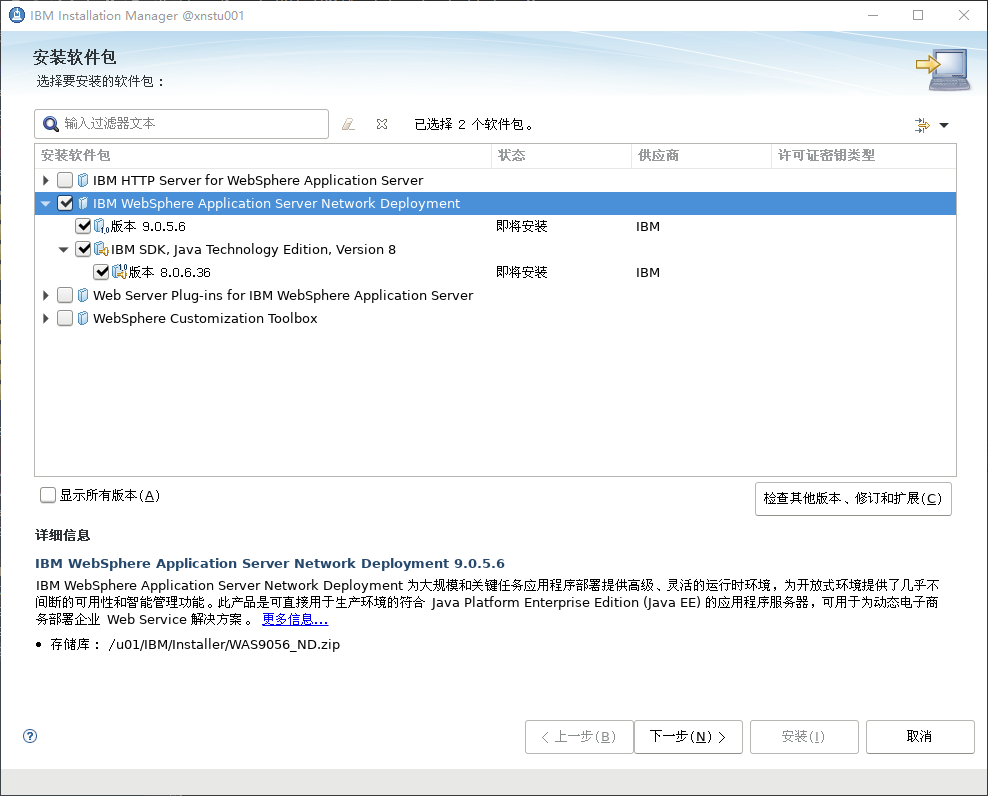
- 选择建议的修订
- 接收许可协议
- 指定共享资源目录位置
- 指定软件安装位置
- 选择语言
- 选择安装功能
- 复审摘要信息
- 开始安装
安装完成后,暂不启动任何程序,选择“无”退出安装程序。
验证安装
可以使用Installation Manager提供的imcl工具验证安装。
方法如下:
[was@xnstu001 tools]$ cd /u01/IBM/InstallationManager/eclipse/tools

[was@xnstu001 tools]$ pwd
/u01/IBM/InstallationManager/eclipse/tools

[was@xnstu001 tools]$ ./imcl listInstalledPackages
com.ibm.cic.agent_1.9.1006.20210614_1906
com.ibm.java.jdk.v8_8.0.6036.20210920_0725
com.ibm.websphere.ND.v90_9.0.5006.20201109_1605
9.0.0.0-WS-WASProd-IFPH31727_9.0.0.20210121_1014
核对上述输出内容,确认安装成功。